
Epson Server Direct Print
Use this guide to configure your Epson receipt printer for Server Direct Print via your Shopify POS Cafe app.
What is Epson Server Direct Print
Section titled “What is Epson Server Direct Print”Epson Server Direct Print is a feature on certain Epson models that allows your receipt printer to connect directly with the POS Cafe server to receive print jobs over the network.
Compatible Printer Models
Section titled “Compatible Printer Models”Epson Server Direct Print is available on TM-Intelligent models, which include the TM-DT series and TM-i series:
| TM-DT Series | TM-i Series | Sticky Label Printers |
|---|---|---|
| TM-T88V-DT | TM-T88V-i | TM-L100 |
| TM-T70II-DT | TM-T70-i | |
| TM-H6000IV-DT | TM-T82II-i | |
| TM-L90-i | ||
| TM-m30III |
Prerequisites
Section titled “Prerequisites”- Epson TM-Intelligent thermal receipt printer (see above)
- Printer connected to your local network via Ethernet or Wi-Fi
- A computer on the same network with a web browser
- Printer serial number (default admin password) - sticker under the back cover
- Your Shopify POS Cafe admin credentials
Step 1: Configure in Shopify POS Cafe
Section titled “Step 1: Configure in Shopify POS Cafe”- In Shopify admin, go to Apps → POS Cafe → Locations.
- Select your location, then under Devices click Receipt Printers.
- Click Add printer. The Add new printer window opens.
- Fill in the printer details:
- Printer Name: e.g., Barista Printer
- Printer Type: leave this set to Epson (the default).
- Prep Areas: select one or more prep areas. Items assigned to these prep areas are sent to this printer.
- Click Add printer. The printer is saved straight away; there’s no save bar.
Your printer now appears in the Printers list as Epson · print server. Click it to expand it: under Setup details you’ll find its Server URL, Username and Password. You’ll paste these into the printer in Step 5, using the copy button beside each value (click the show button to see the password).
Optional printer settings
Section titled “Optional printer settings”The Add new printer window also includes these settings. To change them later, click Edit in the printer’s details or its … menu, make your changes, then click Save.
| Setting | What it does |
|---|---|
| Copies | How many copies of each ticket the printer prints, from 1 to 3. |
| Print Individual Receipts (optional) | Prints one item per ticket. Ideal if you use sticker labels that go on individual cups. |
| Device Source | Print from all POS devices (recommended) sends orders from every POS device at this location. Print from specific POS devices only (advanced) lets you choose which registered POS devices (and POSCafe Online (Web) orders) print here. To see your registered devices, click POS devices on the Receipt printers page. |
Step 2: Print the Network Configuration Sheet
Section titled “Step 2: Print the Network Configuration Sheet”- Power off the printer using its main switch.
- Wait 30 seconds, then turn the printer back on.
- The network configuration sheet will print. (Can take up to 30 seconds.)
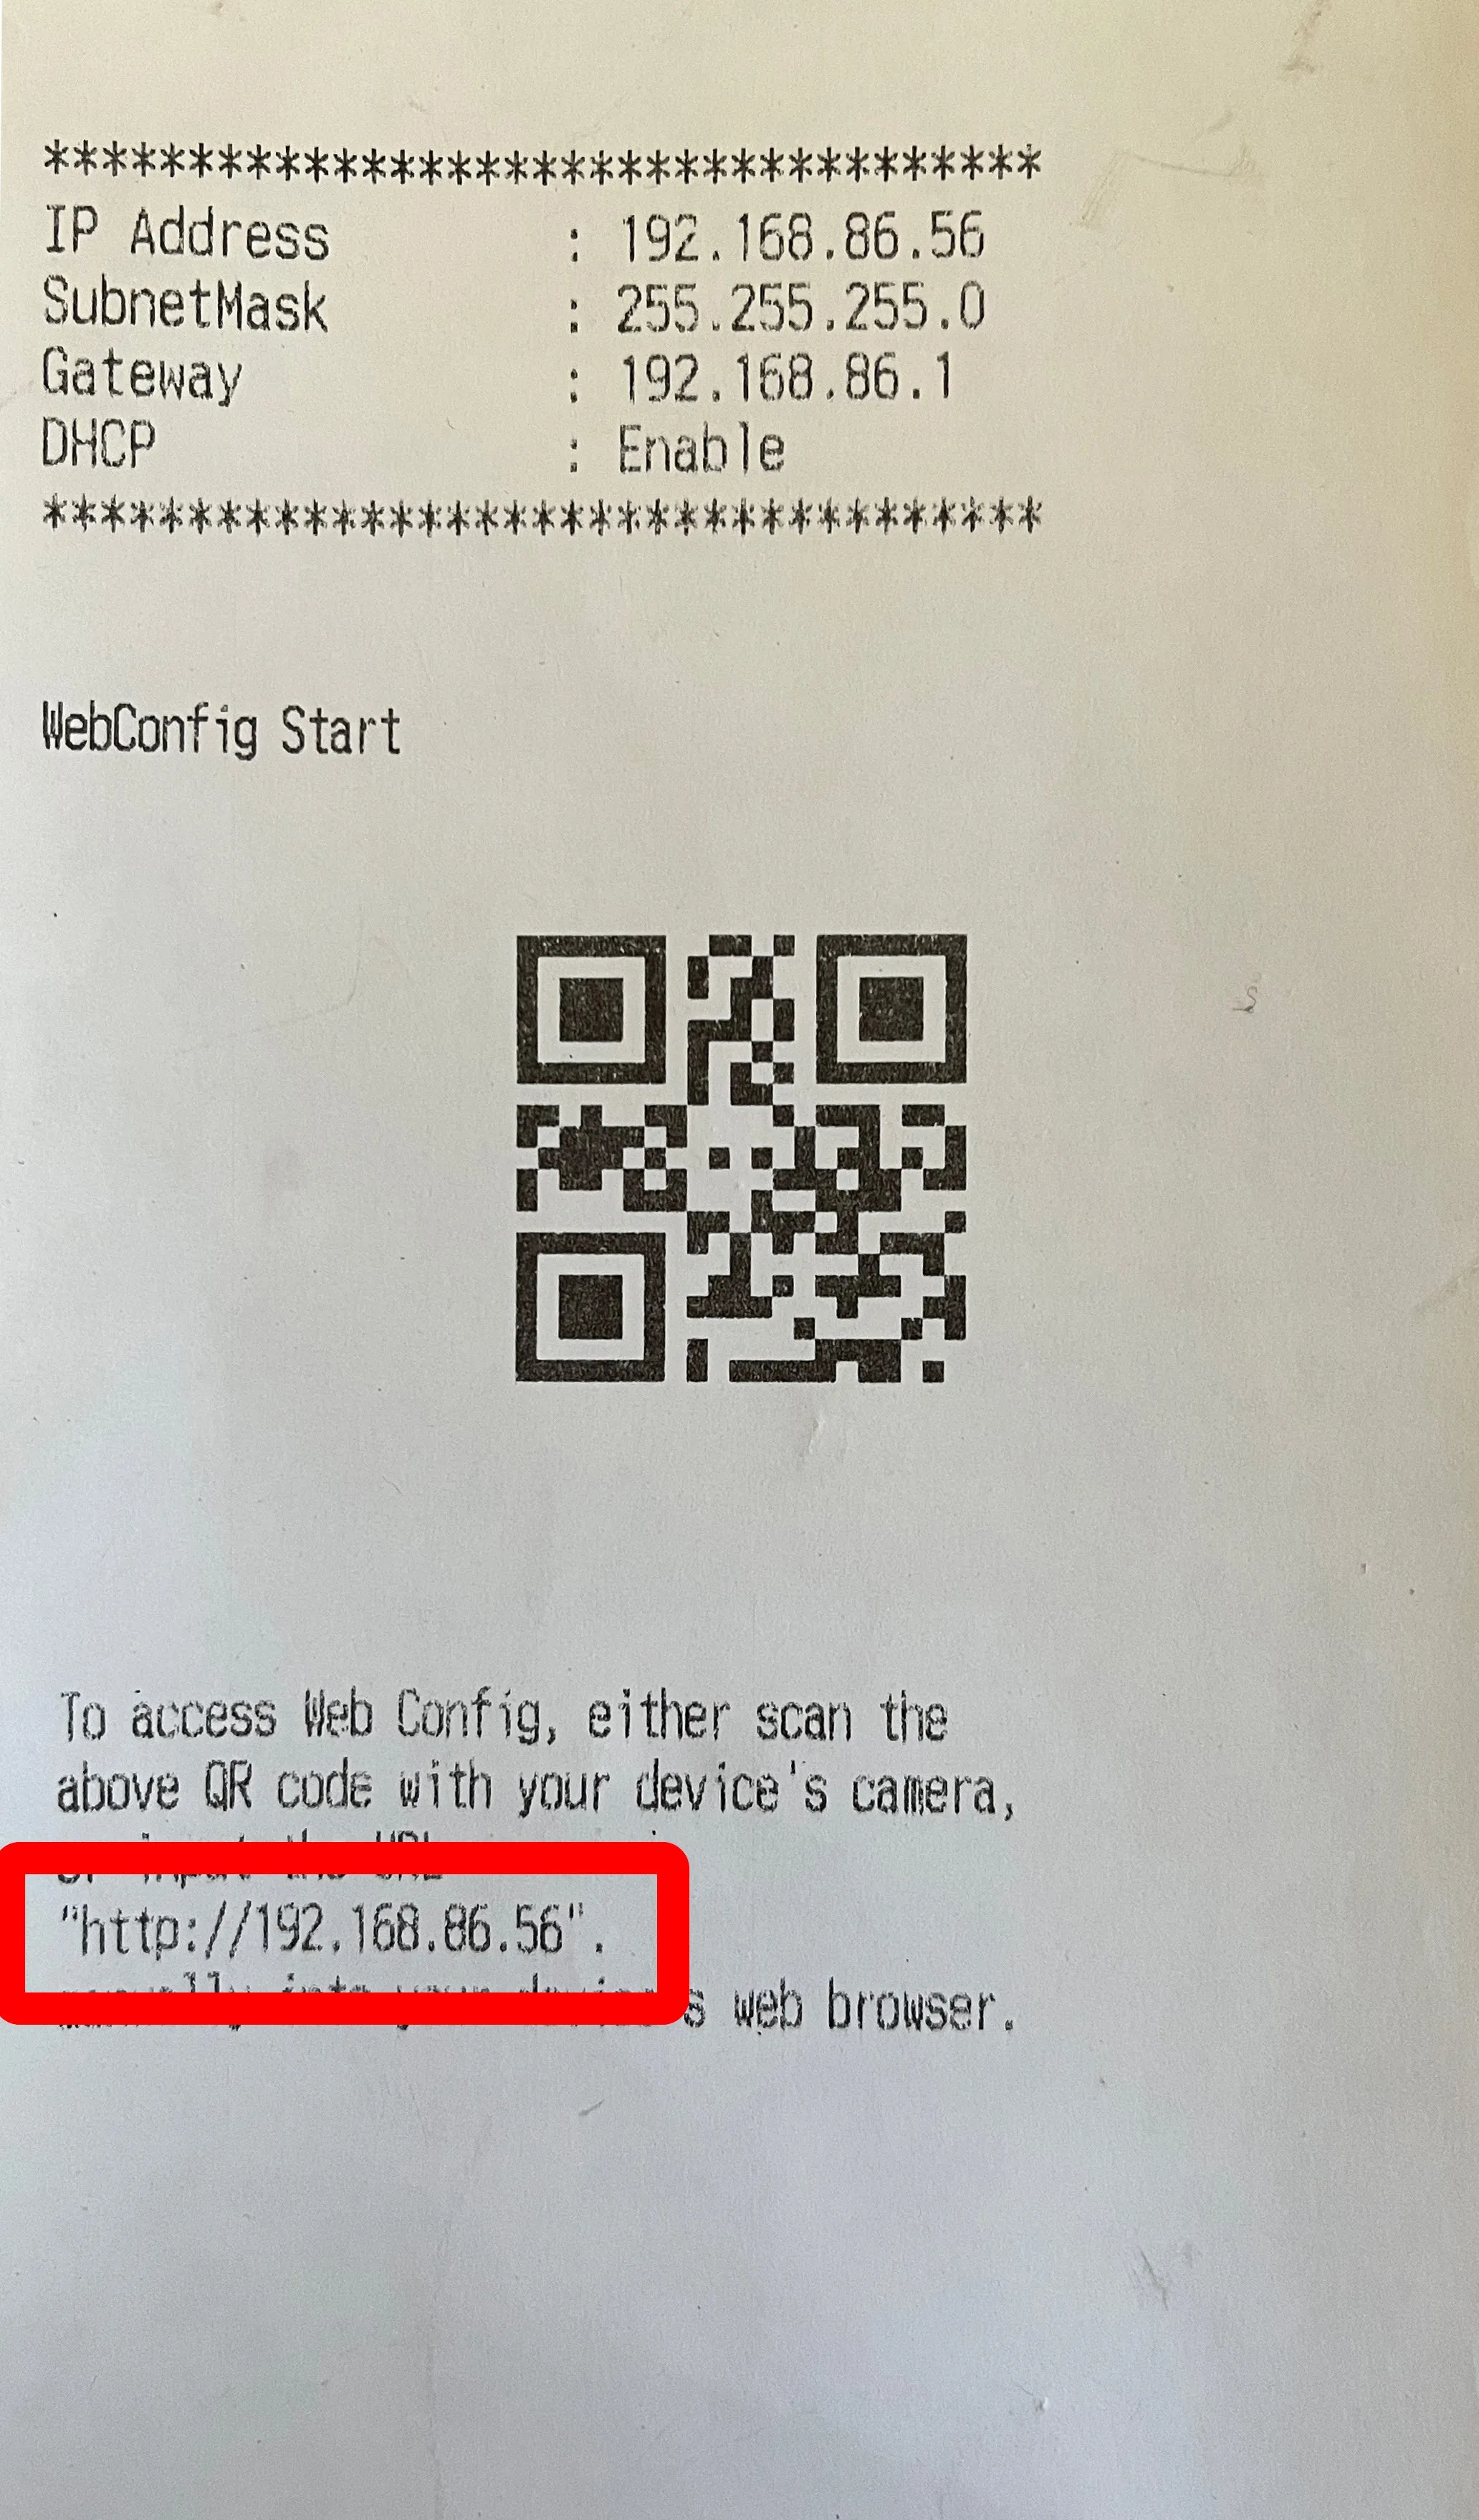
Locate the IP Address on the sheet - this is your printer’s network address.
Step 3: Access the Printer’s Web Portal
Section titled “Step 3: Access the Printer’s Web Portal”- Open a web browser on your computer.
- Enter
http://<PRINTER_IP_ADDRESS>in the address bar. - Press Enter to load the settings page.
Step 4: Administrator Login & TMI Settings
Section titled “Step 4: Administrator Login & TMI Settings”-
Click Advanced Settings:
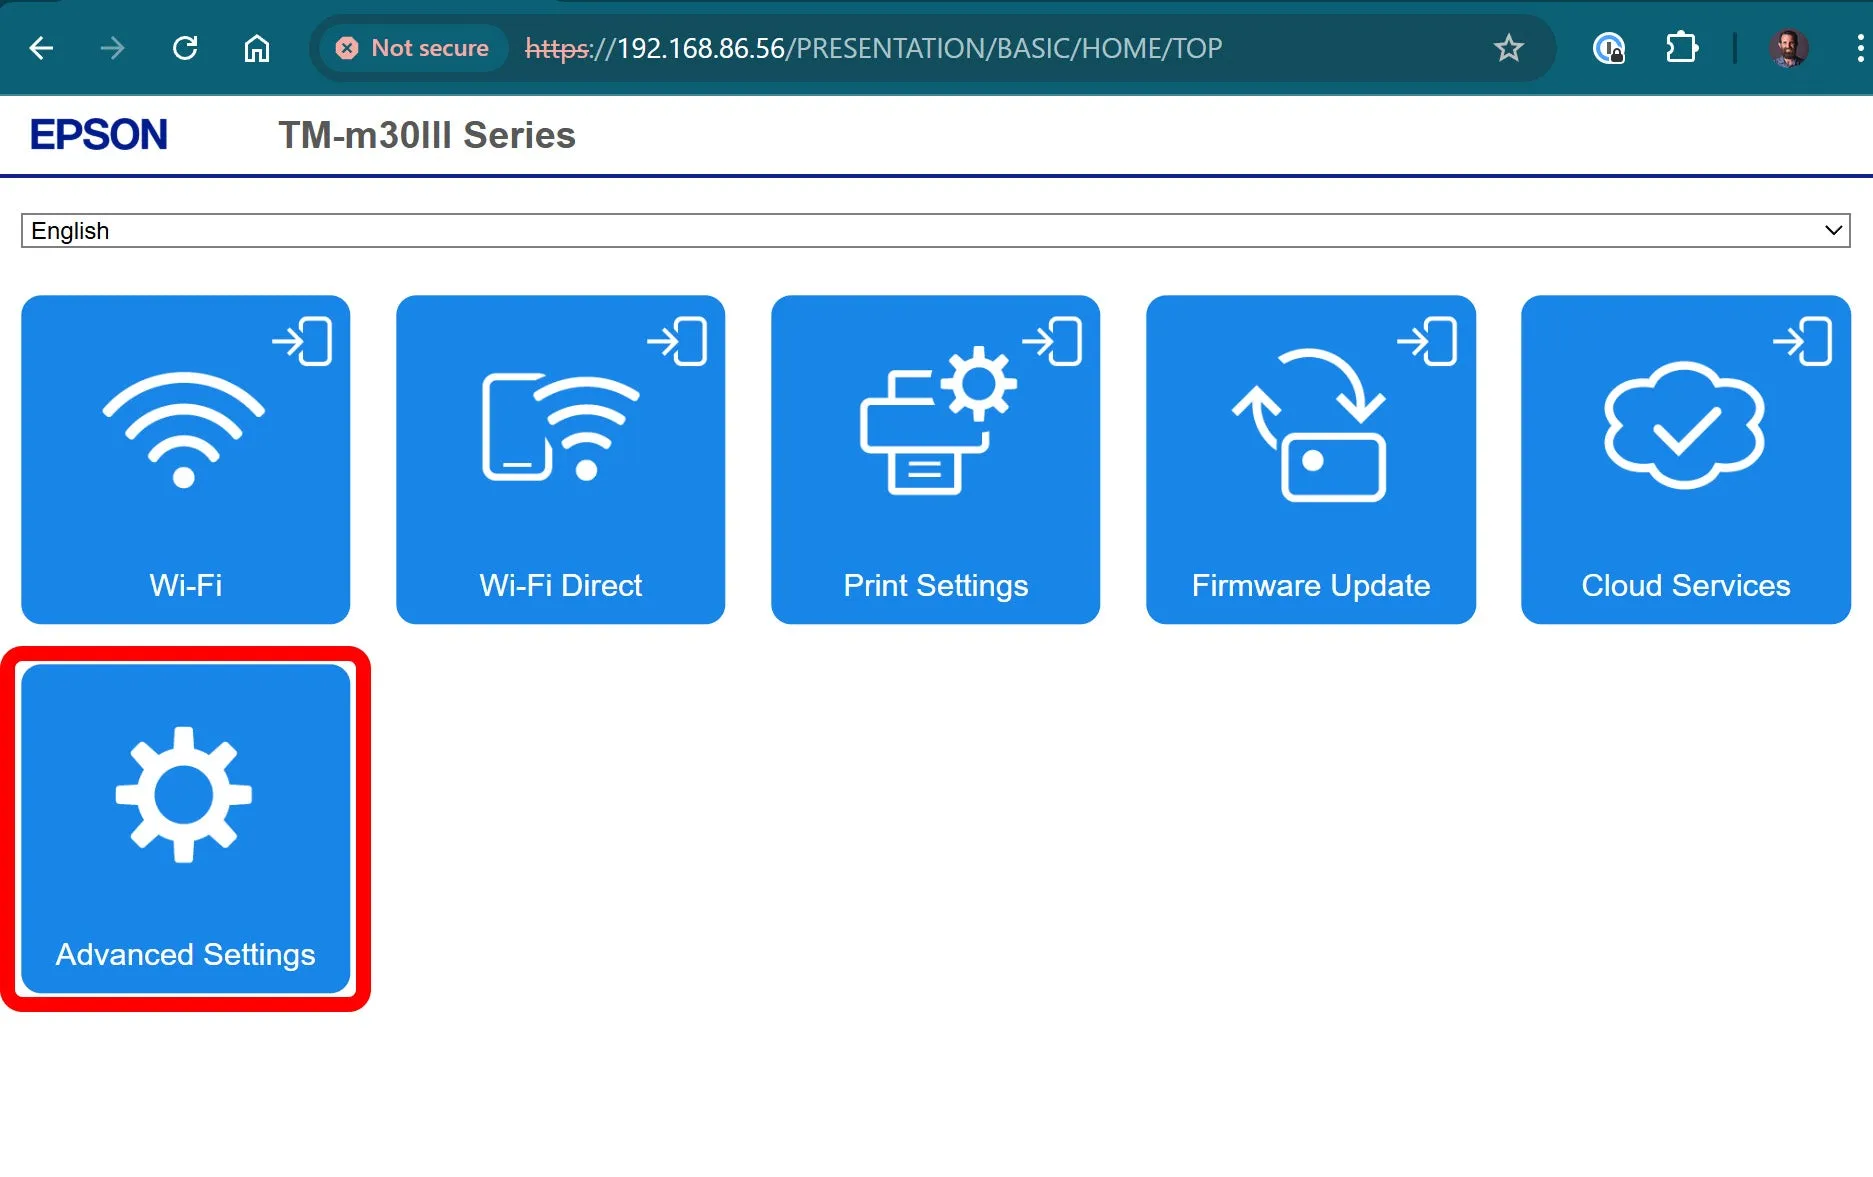
-
Select Administrator Login:
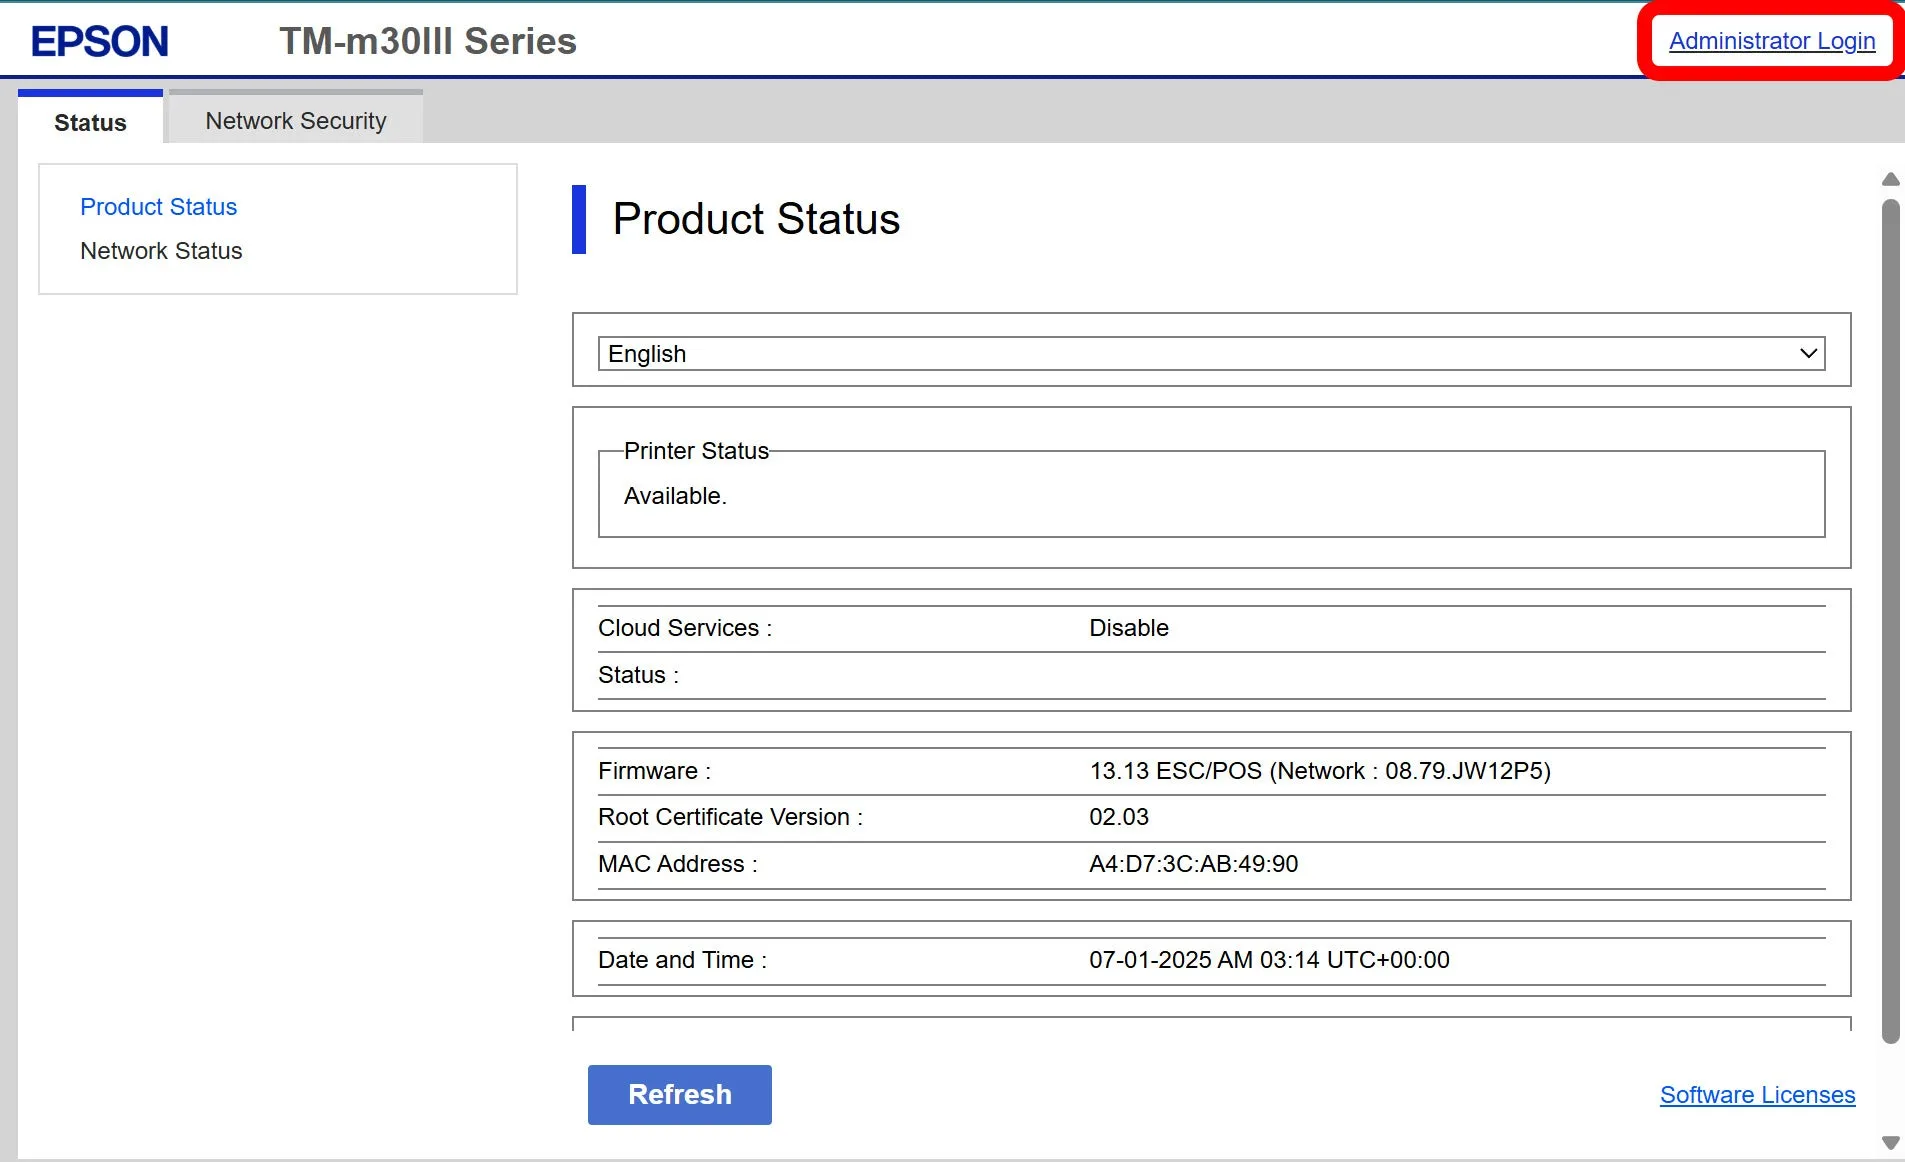
-
Enter the printer’s serial number as the password:
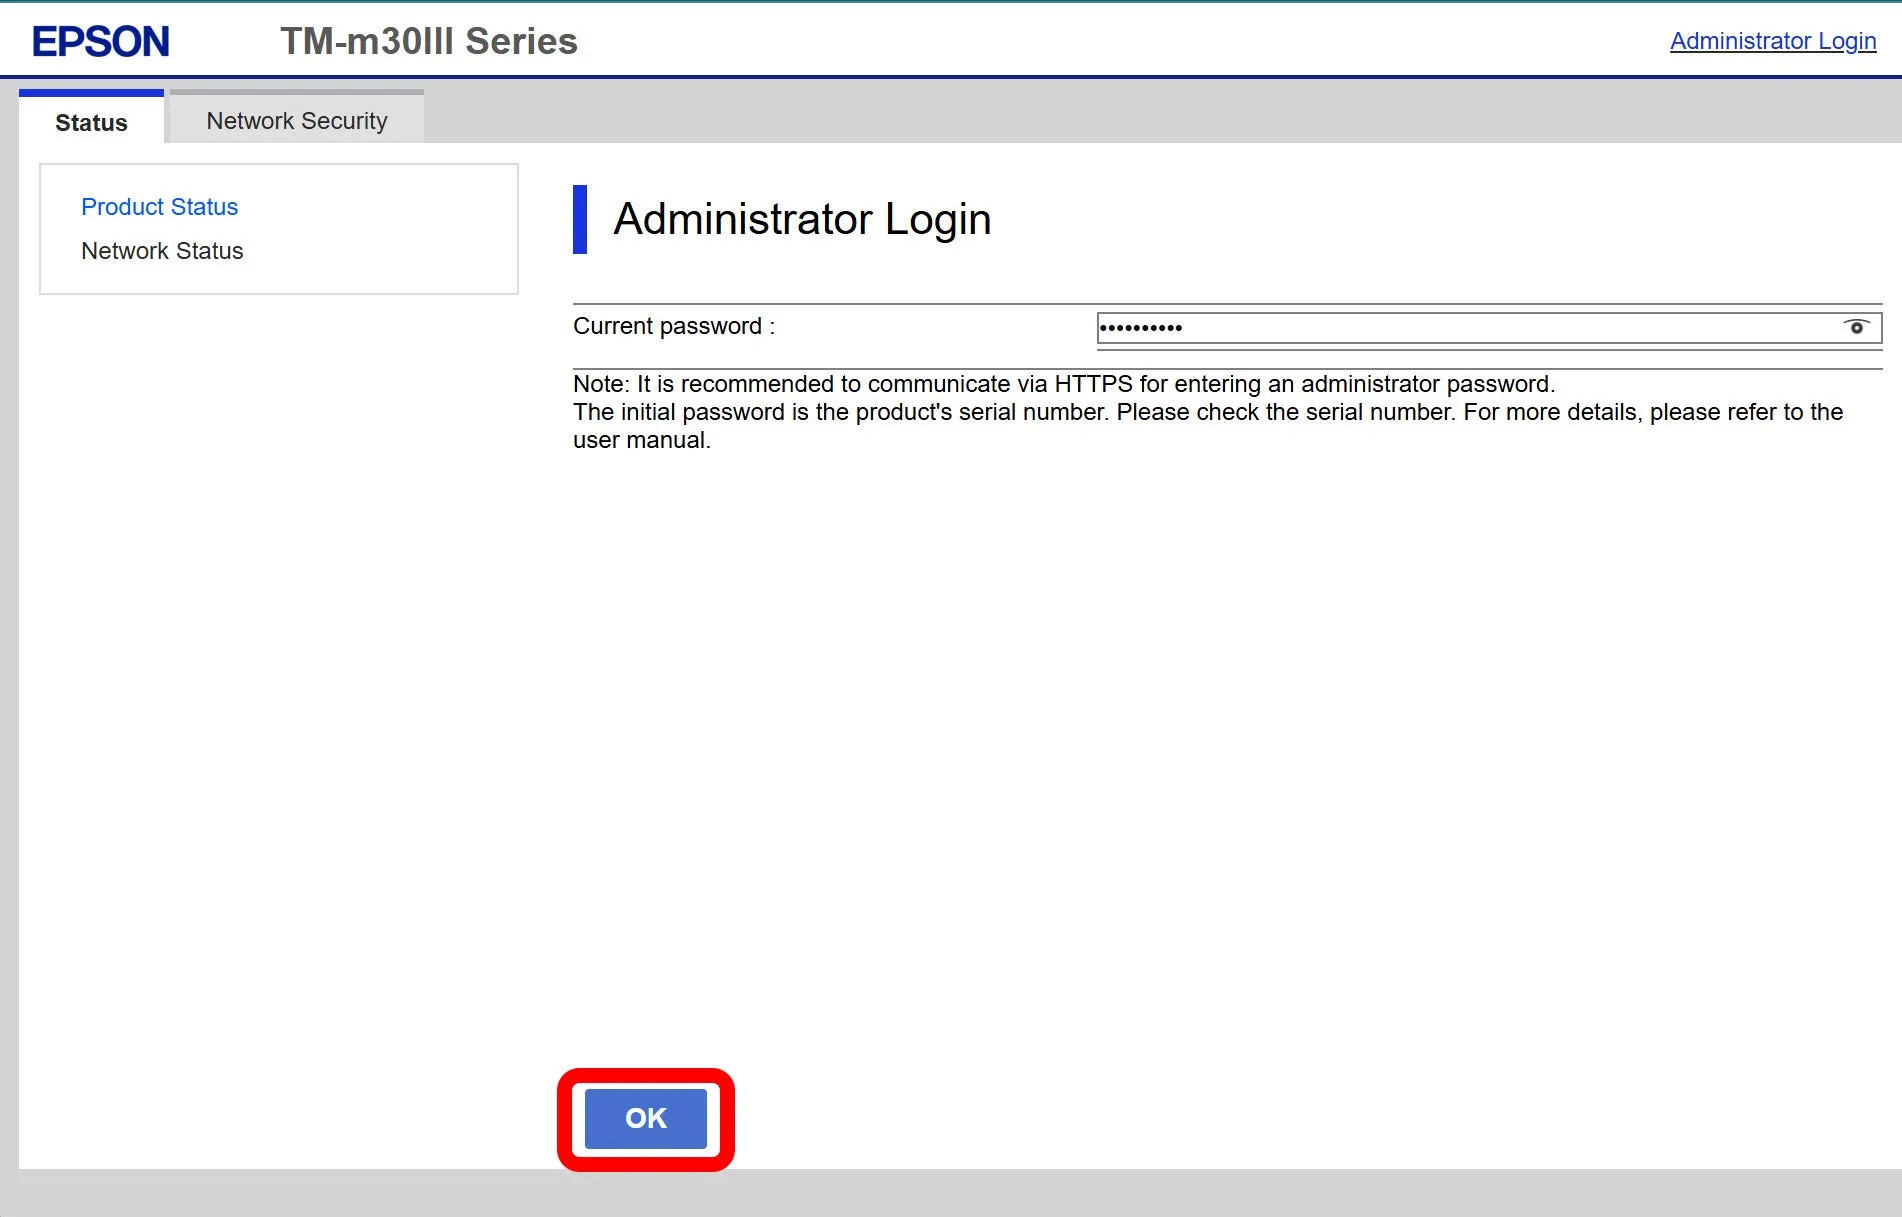
-
Navigate to TMI Settings:
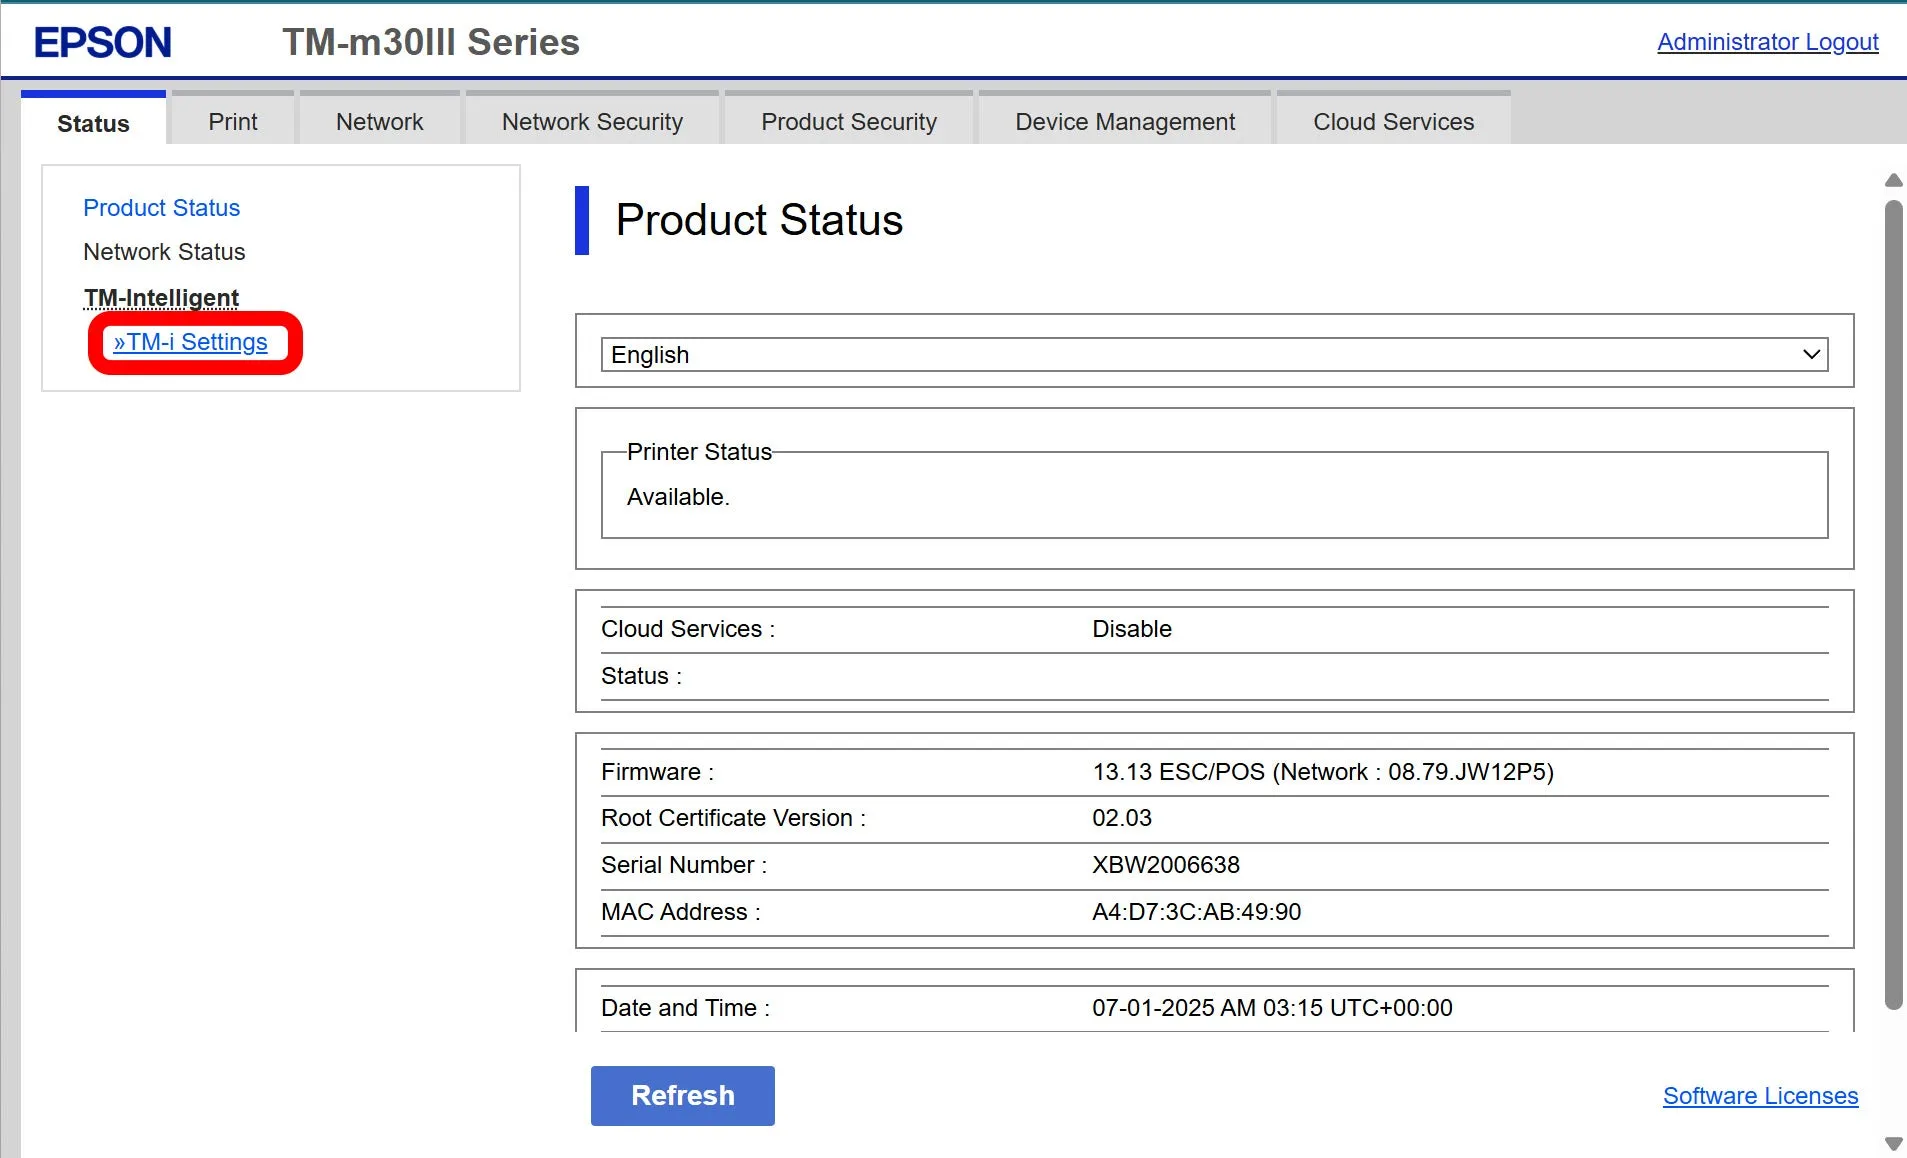
-
Next, choose Server Direct Print:
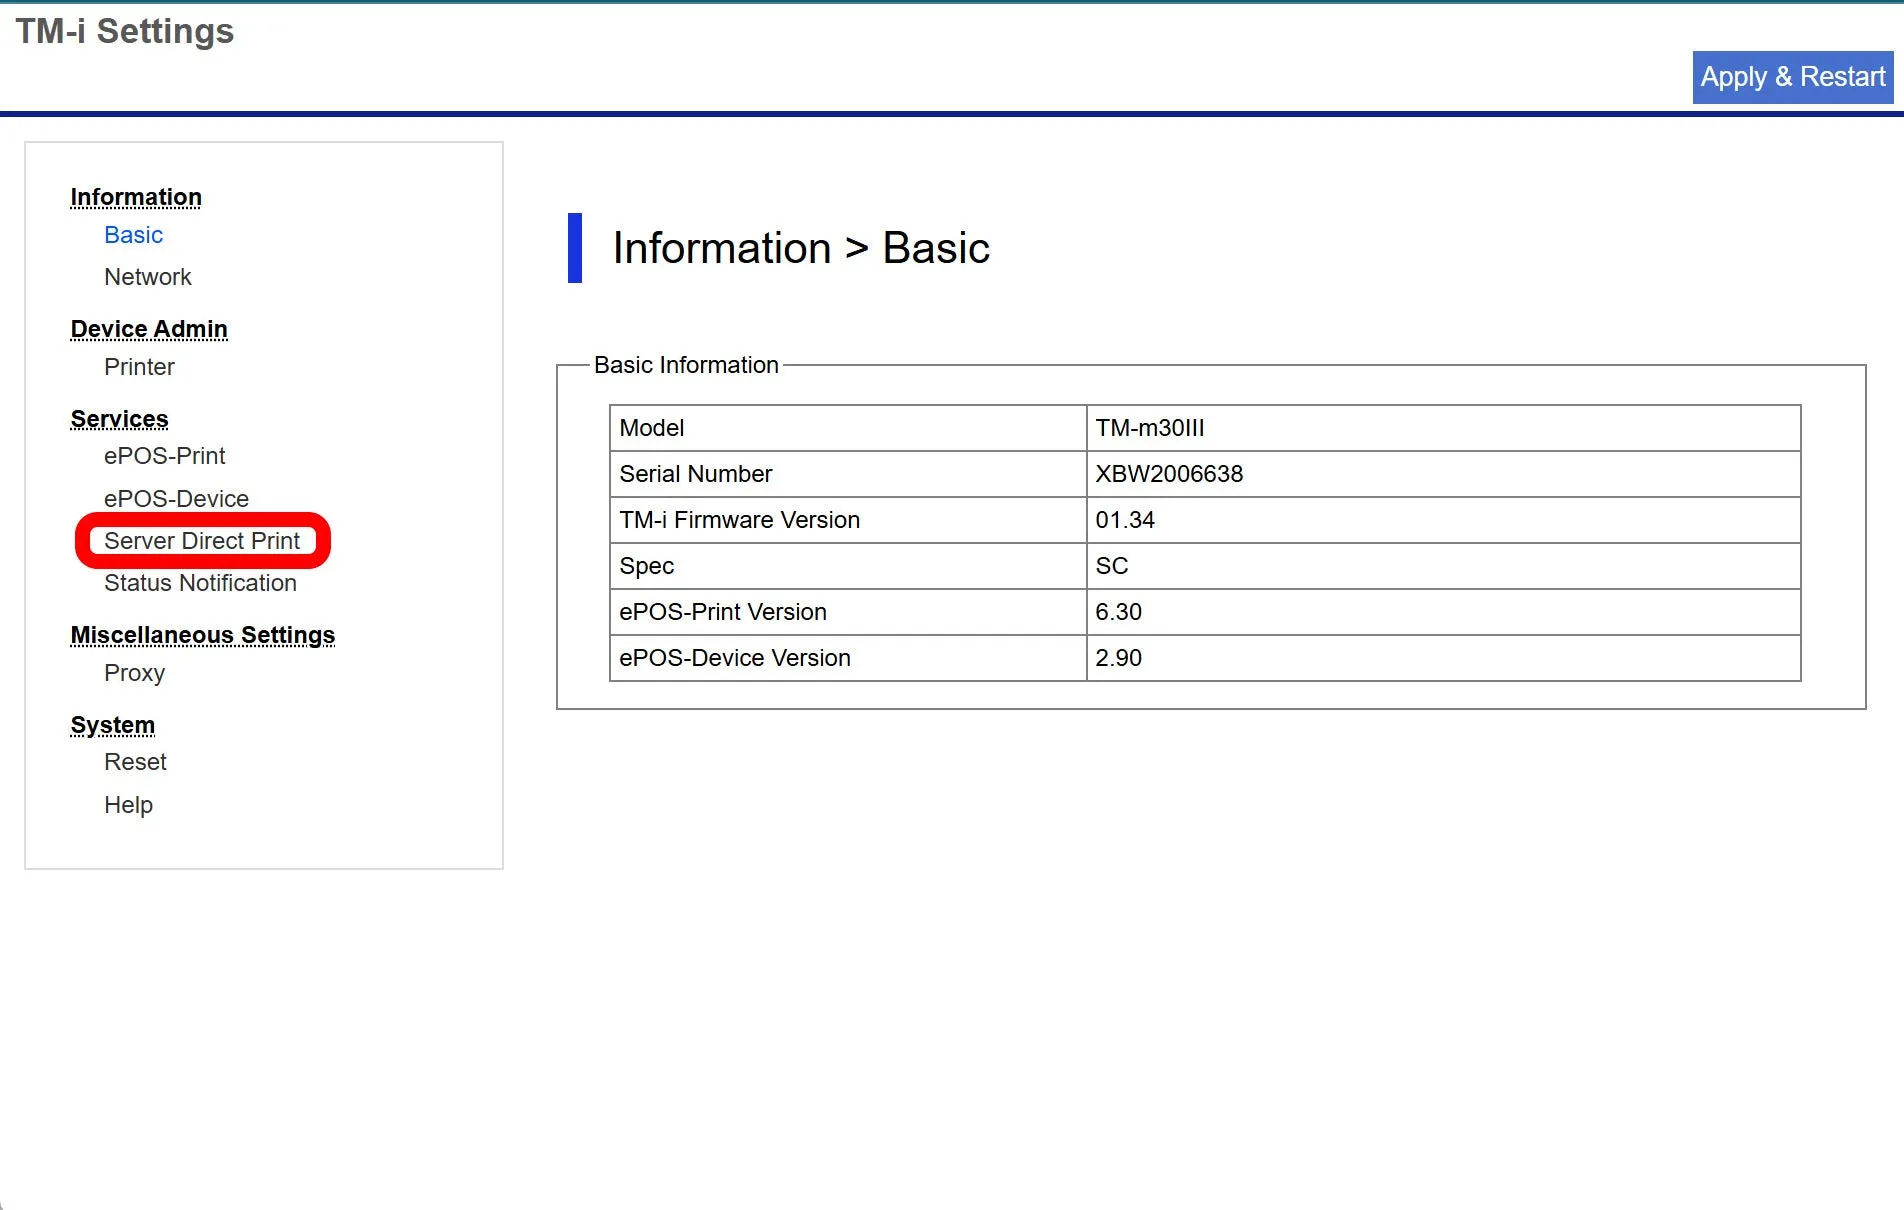
Step 5: Link Printer to Server Direct Print
Section titled “Step 5: Link Printer to Server Direct Print”- Choose Enable from the dropdown list next to Server Direct Print.
- Copy the Server URL from the printer’s Setup details on the POS Cafe Receipt printers page.
- Paste it into the printer’s URL field under Server Direct Print.
- Copy the Username from POS Cafe and paste into the printer’s ID.
- Copy the Password from POS Cafe and paste into the printer’s Password.
- Click Apply, then allow the printer to restart.
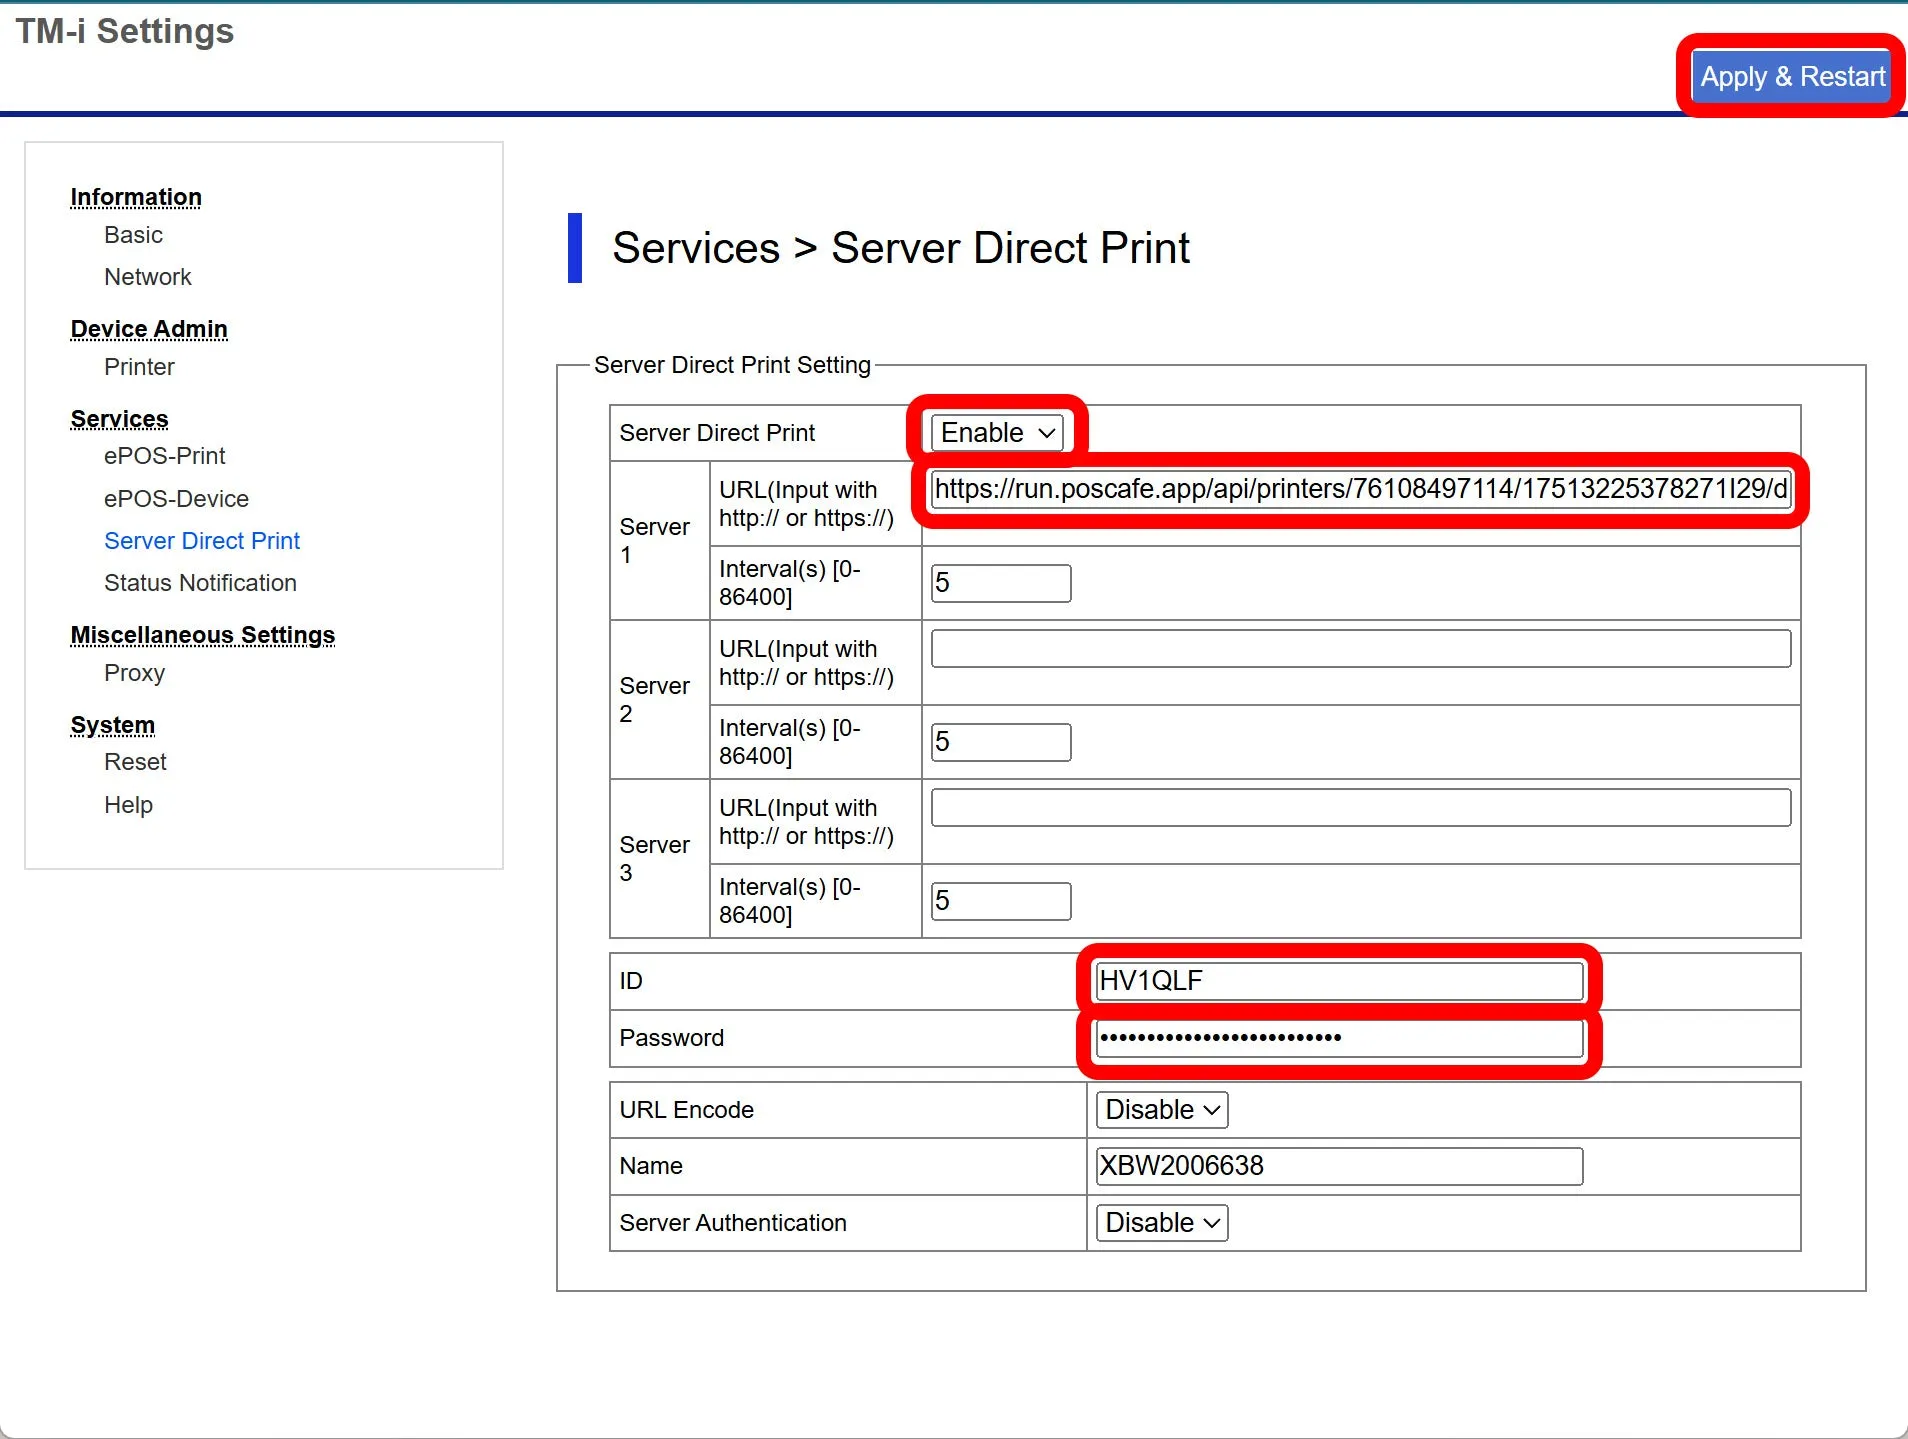
Step 6: Verify Prep Area Assignments
Section titled “Step 6: Verify Prep Area Assignments”Prep areas are assigned to products in POS Cafe, not in Shopify’s collections. Make sure each item has the correct prep area:
- Several products at once: go to Apps → POS Cafe → Cafe Collections, open a collection, select the products, then click Assign prep area. The Prep area column shows each product’s current prep area.
- One product: open the product in POS Cafe and click Edit Prep Area on its Prep Area card.
Step 7: Test Printing
Section titled “Step 7: Test Printing”- Open POS Cafe on your POS device.
- Add a product with modifiers and complete checkout.
- Add another product assigned to a different prep area and checkout again.
- Confirm separate receipts print for each prep area.
Printing Speed & Latency
Section titled “Printing Speed & Latency”Note: It can sometimes take up to 5-7 seconds for Shopify to send webhooks when a new order is placed on POS. Your printer polls our server every 5 seconds for new print jobs, so combined it can take around 10-12 seconds for an order to actually print. Usually it’s faster, but the total time depends on Shopify’s webhook delivery speed.
Troubleshooting
Section titled “Troubleshooting”| Issue | Solution |
|---|---|
| Config Sheet Not Printing | Ensure the printer is powered and networked; hold FEED until you see printing activity. |
| Cannot Access Web Portal | Verify the IP address matches the configuration sheet and that your computer is on the same subnet. |
| Login Fails | Confirm you’re using the printer’s serial number as the password; locate it under the back cover sticker. |
| Print Jobs Not Received | Check that the printer’s URL, ID, and Password exactly match the Server URL, Username and Password under the printer’s Setup details in POS Cafe, that the printer shows Epson · print server under its name, and ensure Standard mode is selected. |
| Printer Shows Offline, Not Connected Yet or Paused | See the status badges in Receipt Printers Page. A paused printer doesn’t print new orders until you resume it. |
| Print Errors | Review logs under Maintenance → Logs in the web portal for error codes; restart the printer afterward. |
| Factory Reset | Press and hold FEED, turn off the printer, then with FEED held, turn on the printer and keep holding for 10 seconds to restore defaults. |